Insulated Siding Installation Cost
Insulated siding installation cost is a significant consideration for homeowners undertaking renovations or new builds. Understanding the various factors that influence this cost, from material selection to labor rates and regional differences, is crucial for effective budgeting and project planning. This comprehensive guide will delve into these factors, offering insights into cost estimation, the installation process, maintenance, and contractor selection, empowering you to make informed decisions.
This guide breaks down the complexities of insulated siding installation costs, providing a clear path to understanding the financial implications of this home improvement project. We will explore different siding materials, analyze labor costs based on project complexity, and offer practical advice on obtaining accurate cost estimates and selecting a reliable contractor. By the end, you will have a firm grasp of the total cost involved and be well-equipped to manage your project effectively.
Factors Influencing Insulated Siding Installation Cost
The cost of installing insulated siding is influenced by a variety of factors, making it crucial to understand these elements before embarking on a project. A comprehensive understanding allows for accurate budgeting and realistic expectations regarding the overall expense. This section will delve into the key determinants of the final cost.
Factors Affecting Insulated Siding Installation Cost
The total cost of your insulated siding installation will depend on several interacting factors. The following table summarizes these key influences, offering descriptions and examples to illustrate their impact.
| Factor | Description | Impact on Cost | Example |
|---|---|---|---|
| Material Type | The type of insulated siding chosen (e.g., vinyl, fiber cement, metal). | Significantly affects cost; vinyl is generally the least expensive, while fiber cement and metal are more costly. | Vinyl siding might cost $5-$15 per square foot, while fiber cement could range from $10-$30 per square foot. |
| House Size | The square footage of the house’s exterior walls requiring siding. | Directly proportional; larger houses require more material and labor, leading to higher costs. | A 1,500 sq ft house will cost considerably less than a 4,000 sq ft house. |
| Labor Rates | The hourly or daily rate charged by the installation crew. | Highly variable based on location, experience, and demand. | Labor costs can range from $30-$70 per hour, or even more in certain regions or for specialized work. |
| Regional Variations | Differences in material costs, labor rates, and permitting fees across different geographic areas. | Significant impact; costs can vary substantially between states or even within a single state. | Installation costs in a high-cost area like New York City will be higher than in a rural area of the Midwest. |
Impact of Material Quality on Cost
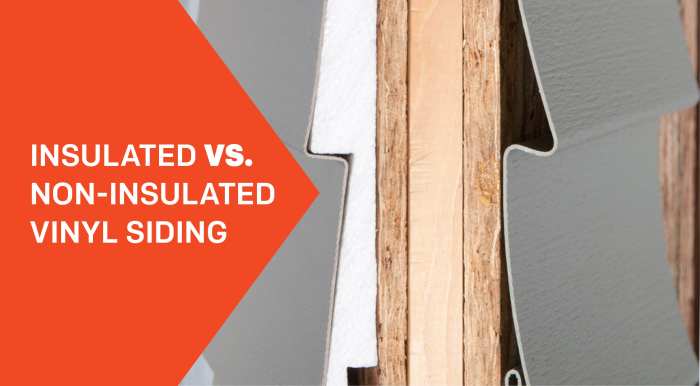
The quality of the insulated siding material significantly influences the overall cost. Different materials offer varying levels of durability, aesthetics, and maintenance requirements.Choosing a material involves weighing the pros and cons:
- Vinyl Siding:
- Pros: Affordable, low maintenance, wide variety of colors and styles.
- Cons: Can be susceptible to damage from impact, may fade over time, less durable than other options.
- Fiber Cement Siding:
- Pros: Durable, fire-resistant, low maintenance, realistic wood-like appearance.
- Cons: More expensive than vinyl, heavier and more difficult to install.
- Metal Siding:
- Pros: Extremely durable, long lifespan, fire-resistant, low maintenance.
- Cons: Can be expensive, susceptible to dents, may be noisy in heavy rain or hail.
Labor Cost Variations Based on Project Complexity
Labor costs are not static; they fluctuate based on the project’s complexity. More intricate projects naturally demand more time and expertise, leading to increased expenses.Factors such as existing siding removal (requiring extra time and disposal costs), difficult access (e.g., multiple stories, steep slopes), and intricate designs (requiring specialized skills and precision) all contribute to higher labor costs. For instance, removing asbestos-containing siding adds significant cost and complexity due to the required safety protocols and specialized disposal methods.
Hypothetical Cost Comparison: Small vs. Large House
Let’s consider a hypothetical scenario: Installing insulated vinyl siding on a 1,000 sq ft house versus a 3,000 sq ft house. Assuming a material cost of $8 per sq ft and labor costs of $40 per hour (including preparation and cleanup), the smaller house might cost approximately $12,000 – $16,000 (depending on labor hours required), while the larger house could cost $36,000 – $48,000 or more, reflecting the increased material and labor needs.
This illustrates the significant cost difference based solely on house size. These figures are estimates and will vary based on the factors discussed previously.
Estimating Insulated Siding Installation Costs
Accurately estimating the cost of insulated siding installation is crucial for effective budgeting and project planning. Several methods exist to arrive at a reliable figure, each with its own strengths and weaknesses. Understanding these methods and potential cost overruns will empower homeowners to make informed decisions.
Methods for Obtaining Accurate Cost Estimates
Obtaining accurate cost estimates involves a multi-pronged approach. Relying on a single method may lead to inaccurate projections. A comprehensive approach leverages the advantages of various techniques while mitigating their individual drawbacks.
Contacting multiple contractors is a cornerstone of accurate estimation. Different contractors have varying pricing structures, influenced by factors such as experience, overhead, and material sourcing. Requesting detailed, itemized quotes from at least three reputable contractors allows for comparison and identification of potential outliers. This competitive bidding process often reveals the most cost-effective option.
Online calculators offer a quick initial estimate, providing a general range for the project. These tools often require inputting project specifics like square footage, siding type, and location. While convenient, online calculators lack the personalized assessment a contractor provides. They should be viewed as a preliminary guide, not a definitive cost.
Reviewing past project costs, either from personal experience or through online resources, can offer valuable context. However, this method should be used cautiously as costs vary significantly based on location, material prices, and labor rates. Using past project costs as a benchmark requires careful consideration of these variables and adjustments to reflect current market conditions.
Comparison of Estimation Techniques
Each estimation technique presents a unique balance of speed, accuracy, and cost. Contractor quotes offer the highest accuracy but require more time and effort. Online calculators are fast and convenient but lack precision. Reviewing past projects provides a general idea but needs careful adjustment for current circumstances.
| Estimation Technique | Advantages | Disadvantages |
|---|---|---|
| Contractor Quotes | Highly accurate, detailed breakdown of costs, allows for comparison | Time-consuming, requires contacting multiple contractors |
| Online Calculators | Quick and convenient, provides a general cost range | Less accurate, may not account for all project specifics |
| Past Project Costs | Provides a benchmark for comparison, useful for preliminary budgeting | May not reflect current market conditions, requires careful adjustment |
Common Cost Overruns and Mitigation Strategies
Unexpected cost overruns are a common concern in home renovation projects. Identifying potential sources of overruns and implementing mitigation strategies is vital for effective project management.
Unforeseen issues, such as discovering rotted wood beneath the siding or unexpected complexities in the existing structure, can significantly impact costs. Thorough inspections and detailed pre-project assessments can help minimize these surprises. Including a contingency buffer in the budget (typically 10-20%) can absorb unforeseen expenses.
Changes to the original scope of work, such as upgrading to higher-quality materials or adding extra features, often lead to cost overruns. Careful planning and adherence to the initial design prevent this. A clear, well-defined contract that specifies the scope of work helps avoid disputes and unexpected expenses.
Material price fluctuations and labor shortages can also contribute to cost overruns. Securing materials early and working with reliable contractors with established pricing can help mitigate these risks. Regular communication with the contractor throughout the project allows for early identification and resolution of potential problems.
Sample Cost Breakdown for Insulated Siding Installation
This example assumes a 1,500 square foot home with standard installation. Actual costs may vary significantly depending on location, materials, and labor rates.
| Line Item | Description | Quantity | Cost |
|---|---|---|---|
| Materials | Insulated siding, trim, fasteners, underlayment | As needed for 1500 sq ft | $10,000 |
| Labor | Installation, removal of old siding (if applicable) | 1500 sq ft | $7,500 |
| Permits | Building permits, inspections | 1 set | $500 |
| Contingency | Unforeseen expenses | 10% of total | $1,750 |
| Total Estimated Cost | $19,750 |
The Installation Process

Installing insulated siding is a multi-step process requiring careful planning and execution to ensure a long-lasting, energy-efficient exterior. Proper preparation and attention to detail are crucial for a successful installation. This section details the steps involved, the necessary tools, and the importance of specific techniques.
Step-by-Step Installation Guide
The following steps Artikel a typical insulated siding installation project. Variations may exist depending on the specific siding product and the complexity of the project.
- Preparation: This crucial first step involves thoroughly cleaning the existing exterior wall surface to remove dirt, loose paint, and any other debris. Any damaged areas of the underlying sheathing should be repaired and replaced as needed. This ensures proper adhesion and prevents future problems.
- Framing and Furring Strips (If Necessary): Depending on the existing wall structure and the type of siding being installed, furring strips may be needed to create a level surface for the siding installation and provide proper ventilation. These are typically attached directly to the house’s framing using appropriate fasteners.
- Installation of Starter Strips: Starter strips are installed at the bottom of the wall, providing a level base for the first row of siding panels. They ensure a straight and even start for the entire installation.
- Panel Installation: Insulated siding panels are typically installed horizontally, starting from the bottom and working upwards. Each panel is carefully aligned and fastened using appropriate nails or screws, following the manufacturer’s instructions. Overlapping joints are crucial for weather resistance.
- J-Channel and Corner Trim Installation: J-channel is installed around windows, doors, and corners to provide a neat and finished look, protecting the edges of the siding and creating a weather-tight seal.
- Finishing and Caulking: After all panels are installed, any gaps or seams should be carefully sealed with high-quality exterior-grade caulk. This prevents water penetration and improves the overall weather resistance of the siding system.
- Final Inspection: A final inspection should be conducted to ensure that all panels are properly installed, sealed, and that the overall appearance meets the desired aesthetic standards.
Necessary Tools and Equipment
Professional installation requires the appropriate tools and equipment for efficient and accurate work. The following list Artikels some of the essential items:
- Measuring tape
- Level
- Circular saw or hand saw
- Drill with various drill bits
- Impact driver
- Nail gun (pneumatic or battery-powered)
- Caulk gun
- Utility knife
- Safety glasses and gloves
- Ladder
- Scaffolding (for taller buildings)
- Putty knife
- Hammer
- Screwdrivers
Importance of Proper Preparation
Thorough preparation is essential for a successful insulated siding installation. Neglecting this stage can lead to problems such as uneven surfaces, poor adhesion, and premature failure of the siding. Cleaning the existing wall surface removes dirt, debris, and loose paint that could compromise the bond between the siding and the underlying structure. Repairing any damaged areas ensures a solid and even base for the new siding, preventing future issues.
Proper preparation contributes significantly to the longevity and performance of the installed siding.
Insulated Siding Panel Installation
Insulated siding panels are typically installed horizontally, starting from the bottom and working upwards. Each panel is carefully aligned and fastened securely using the appropriate nails or screws, ensuring they are flush with the surrounding panels and trim. Overlapping joints are critical for water resistance. Fastening techniques vary depending on the specific siding type; manufacturers’ instructions should always be followed precisely.
Appropriate sealant is applied to all seams and joints to create a weather-tight seal. This process ensures both the aesthetic appeal and the long-term durability of the insulated siding.
Maintenance and Lifespan of Insulated Siding
Insulated siding, while a durable and attractive exterior cladding option, requires proper maintenance to maximize its lifespan and aesthetic appeal. Understanding the expected lifespan of different materials and implementing a routine maintenance schedule can significantly extend the life of your investment and prevent costly repairs down the line. This section details the expected lifespan of various insulated siding types, Artikels essential maintenance tasks, and addresses common issues and their solutions.
Expected Lifespan of Different Insulated Siding Types
The lifespan of insulated siding varies considerably depending on the material used. Vinyl siding, a popular and affordable choice, generally lasts 20-30 years with proper care. Fiber cement siding, known for its durability and resistance to fire and insects, boasts a significantly longer lifespan, typically ranging from 50-80 years. Aluminum siding offers a moderate lifespan of 30-50 years, while engineered wood siding, a more environmentally friendly option, typically lasts 25-40 years.
These estimates can fluctuate based on environmental factors, installation quality, and maintenance practices. For example, coastal regions with high humidity and salt spray might experience faster degradation of certain siding types compared to drier climates.
Routine Maintenance Tasks, Insulated siding installation cost
Regular cleaning and inspection are crucial for preserving the longevity of insulated siding. Annual cleaning, using a gentle detergent and a soft-bristled brush or pressure washer (used cautiously to avoid damage), can remove dirt, grime, and mildew buildup. Inspecting the siding for any signs of damage, such as cracks, dents, or loose panels, should also be done annually.
Addressing minor issues promptly prevents them from escalating into more extensive and costly repairs. Paying particular attention to areas prone to moisture accumulation, such as around windows and doors, is vital. Promptly addressing any water damage will prevent rot and structural compromise.
Potential Issues and Their Solutions
Several issues can affect the lifespan of insulated siding. Cracks and dents can be repaired using specialized fillers and paints that match the siding’s color. Loose panels should be re-secured immediately, while severely damaged panels may require replacement. Water damage, often manifested as discoloration or rot, necessitates prompt attention. Repairing or replacing affected areas is essential to prevent the spread of damage.
Pest infestations, particularly in wood siding, can be addressed through professional pest control services. Regular inspection and early intervention are key to managing these issues effectively.
Common Areas of Wear and Tear and Their Prevention
Imagine a house. Visualize the areas around windows and doors; these are typically high-stress zones. Water can seep in through improperly sealed joints or gaps, causing rot and damage. To prevent this, ensure proper caulking and sealing during installation and re-caulk as needed. Another common area is the bottom edge of the siding, where it’s exposed to moisture and debris from the ground.
Installing splash guards or maintaining a clear space between the ground and siding helps to minimize wear and tear in this vulnerable area. Finally, consider the corners of the house; these areas often experience more impact from weather elements. Regular inspection and prompt repair of any damage in these areas can help extend the lifespan of the siding significantly.
Finding and Choosing a Contractor

Choosing the right contractor is crucial for a successful insulated siding installation. A reputable contractor ensures quality workmanship, adherence to timelines, and proper handling of any potential issues. Selecting a contractor involves careful research, comparison, and communication to ensure a positive outcome for your project.Finding a qualified and reputable contractor requires diligence. Several avenues can be explored, including online searches, referrals from friends and family, and checking with local building supply stores.
It’s also advisable to verify licensing and insurance information through relevant state or local authorities. Thorough research minimizes the risk of encountering unqualified or unreliable contractors.
Obtaining and Comparing Multiple Quotes
Obtaining multiple quotes from different contractors is essential for comparing pricing and services. This allows you to assess the value proposition of each contractor, considering not just the cost but also the quality of materials, the warranty offered, and the contractor’s experience and reputation. For example, comparing quotes that include different types of siding materials will highlight the price differences associated with various quality levels.
A detailed comparison ensures you’re making an informed decision based on a comprehensive understanding of the offerings.
Crucial Questions to Ask Potential Contractors
Before committing to a contractor, several key questions should be asked to assess their qualifications and suitability. These include inquiries about their experience with insulated siding installation, the specifics of their proposed installation process, their licensing and insurance coverage, references from past clients, and the details of their warranty. Clarifying these points upfront minimizes potential misunderstandings and ensures alignment of expectations.
For instance, asking about their experience with specific siding brands can reveal their expertise in handling various materials.
Essential Qualities of a Reliable Contractor
A reliable contractor possesses several key qualities that contribute to a successful project. These include possessing a valid license and insurance, providing verifiable references from satisfied clients, demonstrating a thorough understanding of the installation process, using high-quality materials, offering a comprehensive warranty, and maintaining clear and consistent communication throughout the project. A contractor with these attributes significantly increases the likelihood of a positive outcome.
For example, a strong warranty indicates confidence in their workmanship and commitment to customer satisfaction. Checking online reviews and testimonials provides further insight into a contractor’s reputation and work quality.
Questions Often Asked
What is the average lifespan of insulated siding?
The lifespan varies depending on the material. Vinyl siding can last 20-30 years, fiber cement 30-50 years, and metal siding can last 40-50 years or more with proper maintenance.
Can I install insulated siding myself?
While possible for some DIY-inclined individuals, professional installation is generally recommended for optimal results and warranty coverage. The process involves specialized tools and techniques best handled by experienced contractors.
What are the common signs that my insulated siding needs repair?
Common signs include cracks, warping, discoloration, loose panels, and water damage. Regular inspections are crucial for early detection and timely repairs.
How do I find a reputable contractor?
Check online reviews, request references, verify licenses and insurance, and obtain multiple detailed quotes before making a decision. Look for contractors with experience in insulated siding installation.